Custom Dataset Preparation for Stack-GAN Generative Model Training From Scrap
Stack-GAN is a generative model that is generally used to implement text to image generation applications. In easy language this can be understood as GAN is stacked with another GAN, and the purpose is to generate more refined and up-to-text images.
Stack-GAN :
-
Stack + GAN - Similar to concept of stack in data structures which has elements one above other, here one GAN is put after other GAN with output of one stage getting refined by other.
-
GAN - Generative Adversarial Network, Generative meaning that generates data from noise ; Adversarial here refers to working of 2 models in conflict with each other in this case they are generator and discriminator; Network is simply Neural Network.
-
Generator - It can be considered as unsupervised learning as we only provide input and no output at time of training, purpose is to generate images using random noise which will be tested and classified by discriminator.
-
Discriminator - It can be said as classifier whose task is to take an image input and declare it as a fake or real image. This is trained on real data with actual output also as a normal classification neural network.
-
Goal of training GAN model is to achieve Generator so well trained that it is able to generate images that is like real image and discriminator fails to classify this image as fake; similarly to train discriminator not so much that it always classify output images as fake but train to a certain extent that it makes generator train well
Data Preparation :
Below is the hierarchy for the data and its files to be used in training StackGAN model

-
Categorize all the images into classes and store each image to its belonging class.
-
Create a text file with around 10 sentences, each describing about image background and its component. Perform this task for each image in the dataset. In example below we have written only 3 sentences

-
Create a text file with having name of all classes. In example we have only 2 classes.

-
Create a text file having paths of all the images. Mention class_name/image_name.

-
Split the dataset into test-train and store the encoding in text file where 0 is for train and 1 for test.
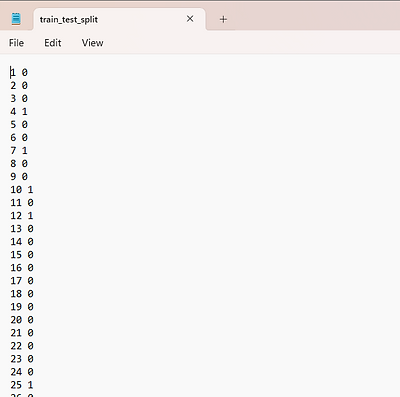
Note : - In all text file the order should be maintained, example - image2 which has 2nd index in images.txt file then 2nd index of all file should correspond to image2 only.
Data Pre-Processing :
-
The first step to split the dataset into test-train, for this any method can be used either using train_test_split function or randomly partitioning.
-
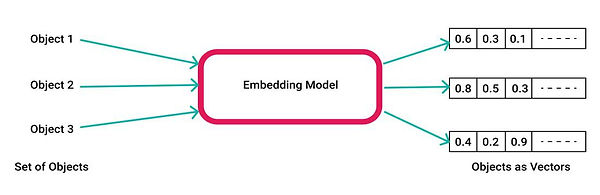
Crucial step is to perform embedding of text to vectors. We call it as sentence embedding. Particularly it depends on test case but here in Stack-GAN char-CNN-RNN embedding is preferred, but we can use other models also such as Bert-cased/uncased, custom trained embedding model and etc.
.png)
-
The most important step to keep in mind is to maintain the dimension of embedding to model's expected input, similarly output of one model should be of same dimension as expected by model 2' s input and if not resize the it.
-
After performing embedding, check each index belong to desired image or not. According to test train split, rearrange all the files in storage in the above shown hierarchy .
-
Now we create our files that will be feed to model code : pickle file, this operation is performed for both set train and test and on files : char-CNN-RNN, images.txt and class info.
.png)
-
Apart from this file there are some optional files that depend on dataset and cases : bounding boxes, parts
-
parts is a text file consist of parts of the class of the image
-
bounding boxes is a text file which contains the location of the respective parts mentioned in previous parts.txt file as pixel location of starting point as x, y and width, height
-
The only other data we need for our model is noise/ Gaussian noise of dimension (100,) that will be converted into image.
Stack-GAN architecture and working :

-
Step 1 : Dataset Preparation - This model requires images, text description files for each respective images, parts/ objects present in image, bounding box of this parts in the respective images, train-test-split files for information and all the available images classes information.
-
Step 2 : Embedding - embedding is done to convert text to numerical values which can be done using various models Char-CNN-RNN is preferred but other can also be used like Bert, word2vec and custom ones.
-
Step 3 : Conditioning Augmentation [ CA ] - model would be creating images output from latent vector or random noise but as a reference to the given input text we have to concat step 2 embedding to this latent vector. For reference purpose lets call this as CA latent vector.

-
Step 4 : Stage I refers to combination of Generator I and Discriminator I,
-
Stage I generator expects CA latent vector, processing this vector a fake image is created of 64x64 pixels which involves upsampling also.
-
Now in stack-GAN discriminator expects image and text associated to it, it checks if they both belongs to each other or not. In this case we input the fake 64x64 px image to discriminator along with embedding. Now if our generator is trained enough to fool discriminator than Stage I is completed.
-

-
Step 5 : Stage II refers to combination of Generator II and Discriminator II,
-
Stage II generator II takes Stage I output fake image (64x64) and CA latent vector to more refine the details in fake image to make it look more like real image in stage II.
-
Before giving input this CA latent vector is compressed and image is downsampled in model to process it more efficiently, which later again upsampled to 256x256 high resolution image.
-
New generated fake image (256x256) by generator II, is then sent to discriminator II along with compressed embedding to check is it real or not; now if generator II fake is able to fool discriminator II then our generator II is good enough to use as final model.

-
Step 6 : In both stages if discriminator is able to distinguish between fake and real then backpropagation is done to improve generator implying that it is not trained enough to fool discriminator.
Model Training and Source Code :
In research paper, optimizer used was Adam (Adaptive Moment Estimation optimizer) and Binary cross entropy loss (BCE) for loss function.
Lets split the code in 2 ways first file wise, we are going to create 3 files each for particular tasks:
creating_text_files.py or ipynb -
.png)
-
PART A :
-
Step 1 : Import the packages we want to use as well as mention the path of the data such as images and extra data that we need
-
Step 2 : There is demonstration of file getting created on real data 1st is images.txt that refers to path of image located from root directory, its representation of output file can be seen in above data preparation part.
-
-
PART B :
-
Step 1 : Second file created was for this custom dataset case for which we took the whole image as bounding box region, but depending on our case the purpose here is to find and mention that region only which has our characteristic object and its location in terms of pixel location as used here as starting point as 0.0,0.0 and width and height can be considered as 64.0,64.
-
Creating model.py file -
.png)
-
Step 2 : Load all the files and data we created previously
-
These below are must loaded files which are required for training, previously we have saved them into pickle file and here we load them unpickle them.
-
.png)
-
Step 3 : Load image, load bounding box and load dataset functions to get all the data prepared on board then we are ready to train the model.
.png)
-
Step 4 : Further model follows stage I training, saving its weight and using them for stage II training. These all training code are easily available in open source or can follow using by own code link mentioned below.
To apply Stack-GAN for your custom dataset view my project for help - https://drive.google.com/drive/folders/1pM2ZH0jETAxeVazbSjsZrkpSB1xnbz-s?usp=drive_link
Original code and viewed from GitHub repository of StackGAN and a medium blog for training model
Conclusion :
The major problem while training StackGAN text-to-image model was not proper available custom data preparation and preprocessing guide which I tried to solve in this article. I hope it would have helped, for my contact here is my LinkedIn - linkedin.com/in/mridul-gupta-2906